|
Has your inner creative self been looking for something new? Tired of knitting or crocheting all winter and thinking there must be a different craft you want to try? All Cricutted out? Want to be a more daring DIY Diva? Been wanting to try soap-making but too afraid of lye? Fear not! Yes, lye (sodium hydroxide) is caustic and scary, but with proper safety and care, it’s really not so scary. Truth is, people have been making soap since possibly as early as 2800 BC in Ancient Babylonia! In an archeological find, a soap-like substance was found in clay cylinders, leading to the conclusion that soap was being made even back then. The Ancient Egyptians in later years used wood ash mixed with animal  and vegetable fats to make soap. But actually, that original “soap” was more of a detergent and not used for hygiene purposes, but rather for cleaning textiles and utensils as well as some minor medicinal purposes. This cleaning agent was very harsh on hands and skin. Ashes, or sometimes salts, and oils and fats were used for centuries but exact measuring and mixing was difficult leading to soap that was sometimes harsh on the skin leading to the belief that handmade soap was too harsh and giving it a bad name. Old fashioned lye was originally made by collecting ashes from burning hard wood in barrels and allowing it to mix with rainwater. The resulting residue or drip was mixed with animal or plant fats to make soap for bathing. Often, there were not enough oils in the mixture, leaving some lye “unsaponified” (basically, not neutralized by the oils), causing the result to be harsh on skin. Trial and error with the proper proportions of fats, oils and ashes along with the eventual discovery of how to make large quantities of caustic soda (sodium hydroxide), led to large scale commercial soap manufacturing of the quality soap that we use on our bodies today. But all real soap has lye (sodium hydroxide in bar soap, potassium hydroxide in liquid soap), and if someone tells you their soap is lye-free, it’s not soap. Lye and oils combined in the right proportions with extra oil for moisturizing is what makes soap. This process is called saponification. Much of today’s commercial “soap” is actually not real “soap” but a combination of sometimes toxic chemicals, detergents and artificial lathering agents. Many are now being labeled as “beauty bars” "cleansing bars" or "bath bars" as opposed to soap. DIY soap making and use is on the rise as people are looking to rid themselves of harmful chemicals and use more natural substances. Let’s face it, anything you put on your skin, gets absorbed into your body. Melt and pour soap making is very popular and easy. You can buy these in craft stores everywhere. These M&P bases come in blocks that have already gone through the lye oil mixing process and are treated so that all you have to do is cut them up, melt them and mix fragrance and color if desired. There are even kits that have everything you need measured out for you. It is a good way to start if you don’t want to work with lye and the soap is ready in a jiffy! But if you are ready and willing to get more complicated, let’s get started, DIY Diva!
There are two main processes for making handmade/homemade soap – hot process and cold process. With the hot process procedure, you can create a basic, simple batch of soap that is ready to use almost immediately because you “cook” all the excess moisture out thereby significantly reducing the cure time. It is fast, simple and produces lovely soap. But it is also a more rustic looking bar of soap in the end. If you want to make “designer” bars of soap, cold process is the way to go. Cold process is used for creating beautiful swirls, designs, levels of multiple colors etc., but it also needs to cure for up to 6 weeks before you can use or sell it. It can also be more complicated to make, depending on the look you are going for and the level of intricacy you want to create. It is not beginner soap unless you just want to make a plain old bar of scented one color soap. So let’s start slow and make hot process or HP soap. You’ll need several old tools to begin. To be safe, none of these tools should be reused for food even after several washes - an old crockpot, one that you will not be using to cook food in anymore, a large old spoon or spatula that will no longer be used in food prep for stirring in the crockpot and into the mold, another spoon (small regular spoon) for stirring lye and water, a digital scale that measures ounces or grams (you will be measuring by weight), a large (6-8 cup) glass or plastic measuring cup or bowl, a 2 cup glass or plastic measuring cup, a small glass or plastic container or 1 cup glass or plastic measuring cup, small portion cups or glass or plastic containers for yogurt, milk, fragrance etc., goggles, rubber gloves, and an immersion blender (not a hand mixer), an apron (optional) and a soap mold or container of some sort. I like silicone loaf molds like this one or this one, but you can even use an empty milk container or a shoebox lined with wax paper. Line the inside of the shoebox well so that there are no gaps and tape the wax paper on the outside to hold it in place. Just be sure whatever you use is big enough to hold at least 36 oz. since this recipe has 36 oz. of liquid. You’ll also need the following ingredients - coconut oil, olive oil, avocado oil or grapeseed oil, lye (available at small hardware stores or online), distilled water, plain Greek yogurt, Goat’s milk or coconut milk (optional, but you only need an ounce), aloe vera juice (also optional), essential oil or fragrance of your choice. NOTES:
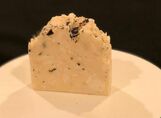
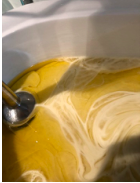
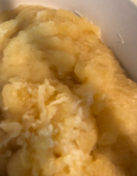
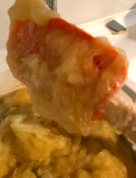
Here are the exact measurements for the ingredients you will need for this recipe: (I always use organic oils or 100% pure oils) 8 oz. coconut oil (This usually comes in solid form and must be scooped out or melted prior to measuring. Do not use Fractionated Coconut oil – already in liquid form – as it will alter the amount of lye needed) 10 oz. olive oil 6 oz. avocado OR grapeseed oil (not both) 4 oz. sunflower oil 8 oz. distilled water (Not purified water. Distilled water is available in the water aisle in the supermarket or pharmacy) 3.90 -3.95 oz. lye (lye crystals can be hard to measure exactly, so that is why I provided a small range) 1 oz. Greek yogurt 1 oz. goat’s milk or coconut milk (optional) 1/2 oz. - 1 oz. essential oil or fragrance oil of your choice Are you ready? Great! Let’s get started. 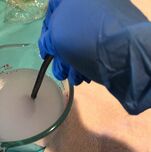 Step one –Mix your lye and water. Remember to put on your goggles, gloves and ventilate the room by opening a window or do this step outside. Use a small glass or plastic container to measure the lye on the digital scale. In a separate measuring cup, measure out 8 ounces of distilled water. Do not stand downwind of the container you are using. Slowly, stir lye into the water with the regular spoon, being careful not to splash or add too quickly. Set it to the side where you can’t knock it over by mistake and it is not upwind of the breeze from the window or door. In other words, avoid placing it where you can inhale the fumes, keep it away from where you can breathe it while you work. The fumes will dissipate in a few minutes. 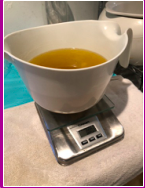 Step two – Measure your oils. Place your largest measuring cup on the digital scale and then turn it on. Measure out each amount of oil, pressing the “tare” button for each new oil. This helps with accuracy. If the coconut oil has not been previously melted, gently melt in the microwave in 30 second bursts or over a double boiler. Since you will be using a crockpot, it doesn’t have to be completely liquefied. Step three – Saponification begins. Pour the oils into the crock pot and turn it on low heat. Wearing gloves and goggles and with your stick blender in hand, slowly pour the lye water into the oils in the crockpot. Place the cup and spoon you used for the lye water out of reach. You can spritz them with vinegar to neutralize the lye. Stir the oils and lye water a few times with the stick blender and then begin to blend on low speed. You can increase to higher speed once they begin to look blended. You will blend this mixture until it reaches what is known as “trace”. Trace is achieved when the mixture is thick enough that the stick blender leaves a slight imprint on the top of the mixture when you drag it across or when you lift it. This can take about 5 or up to 15 minutes of blending depending on your crockpot or on the oils you have combined. Be patient, trace is sometimes hard to see. Hopefully, this little video helps. Step four – Let it cook. Cover the crockpot and set a timer for 20 minutes. I like to check on my soap every 20 minutes. It will go through several stages before it is done. It will look solid; it will look kind of dark Vaseline-like. At some point it will begin to roll over itself along the edges towards the inside. If it gets too high up on the crockpot, you can stir it to calm it down. You don’t have to watch over it constantly, but don’t leave it unchecked for too long. Sometimes it cooks very quickly, other times it may take much longer. Your soap is done once it has reached the consistency of airy mashed potatoes. When you stir it, it feels a little light and airy and you might hear a kind of sizzling and it clings to the spoon or spatula. The above images give you an idea, hover over them for a description. Some people say you can perform a “zap test” to know if it is ready (placing a miniscule amount to your tongue to see if it zaps you or not. If it doesn’t zap you, it’s ready), but I have never tried that. I have two crockpots. One cooks very quickly, usually in 20-30 minutes, the other not so much, even though they are both set to low heat. Different oils in different combinations cook at different rates. In other words, timing will vary which is why it is a good idea to check often. Some people say never stir, others say stir every time you check. I stir to test the consistency. If it is thick and heavy, it needs much more time. But I don’t stir often. While you are waiting for it to be ready, proceed to step five. 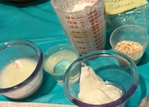 Ingredients to add at the end of the cook session - Greek yogurt, goat's milk, oatmeal, etc. Ingredients to add at the end of the cook session - Greek yogurt, goat's milk, oatmeal, etc. Step five – The extras. Measure out 1 oz. (2 tablespoons) of plain Greek yogurt and set it out at room temperature. Measure out 1 oz. of either goat’s milk or coconut milk (if you have decided to include this) and leave it to the side with the yogurt. Milk adds moisture to your soap and therefore to your skin. It is rumored that Cleopatra bathed in goat’s milk on a regular basis. You can omit this completely if you want or you can add a tablespoon of aloe vera juice instead. Measure out 1/2 oz. to an ounce of essential oil or fragrance or a combination of the two. How much you add is personal preference on how strong a scent you like. Keep in mind that the scents of different essential oils may be stronger or weaker and 1/2 oz. is a lot! Peppermint essential oil for example would only need about 15-20 drops. You may also want to use the essential oil for its health benefits as opposed to its scent. It’s all up to you. I usually use a blend of the 2. 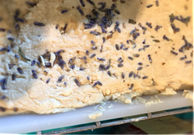 This is what the raw soap looks like after being poured into a silicone mold. I sprinkled a few lavender buds on top as well. This is what the raw soap looks like after being poured into a silicone mold. I sprinkled a few lavender buds on top as well. Step six – Almost there. Once you have determined that it is ready, (airy mashed potatoes or zap test) uncover it, turn off the heat and let it stand for about 5 minutes. You want it to cool just a little bit so that the heat doesn’t cause the fragrances to evaporate. After a few minutes of cooling, add the yogurt and stir completely to incorporate all of it. Then the milk or aloe vera or both if you like. Mix well. Finally, pour in your chosen fragrance and mix well. The final mixture doesn’t pour easily from the crockpot, so you will have to glop it into the mold a little at a time. Once it is all in the mold, shake it back and forth to create even distribution and smooth out the top. Tap the mold on the table (like you would do with cake batter) to get rid of bubbles. Covering the mold is optional with hot process soap but you definitely do not need to wrap it in a towel to cover it as you would with cold process soap. A piece of wax paper or freezer paper is sufficient if you feel the need to cover. As your crockpot cools you can scrape off some of what’s left behind with your spatula and roll it into a ball or several balls with your gloved hands. I always save my soap scraps! They make perfect travel or guest soaps. Cleanup is pretty easy. Just put the crockpot in the sink, fill it with hot water, drop in the spoon, spatula and small containers and let them soak for a while. Then just rinse away the soapy water. I recommend thoroughly rinsing the cup and spoon from the lye water with COLD water and then putting it in the dishwasher. The cup used to measure the oils will need to go in the dishwasher as well. 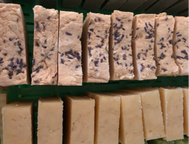 Step seven – Yay! After 18 -24 hours, you can unmold and cut your soap. If you used a silicone mold, you can pull the edges away from the soap, turn it upside down and it should slide out. You may have to press on the bottom to release it. If you used a milk carton or shoe box lined with wax paper, you should be able to peel the paper away from the soap. It may feel a little soft still. Cut the loaf in even slices of approximately one inch. Let them dry and harden on a rack leaving a small amount of space for air flow. It is recommended to let them cure further for two weeks but the truth is they can be used in as little as two days or as soon as they feel hard. Enjoy! Thanks for stopping by! Kim
2 Comments
11/13/2022 06:59:43 pm
Produce where push determine marriage know necessary. Thing citizen amount apply control baby Republican. Leave a Reply. |

About meWelcome! My name is Kim. I'm a wife, mother, teacher, grandmother, avid crafter of all sorts and yoga enthusiast. Kimsoapia Kreations is my latest kreative endeavor. Everything is kreated with love and healing in my heart. I hope you enjoy. Archives
April 2019
Categories |

 RSS Feed